
Making a Singing Bowl Case
Click here to skip directly to the Haphazard Instructions
I collected my singing bowls over a period of time, searching out appropriate avenues to purchase them. My first bowl was a metal Nepalese “full moon” singing bowl gifted to me by my best friend on my birthday. I have used it in many a ritual since receiving it. I also have a little metal one with moon phases on it adorning my hallway that I like to chime as I pass it by and take a moment to listen to it.
But the crystal bowls I have in a set, which I took my time searching for piece-by-piece used in various places. They are the most musical as I have a full major saptak. They are lovely and fragile and I like to play them outside sometimes. Carrying them one-by-one is risky and rather off-putting, so I wanted a nice way to protect and transport them. One day, I will carry them to the desert where I will play them for the vultures and that cacti.
I know that the big online marketplaces sell nice looking purple cases for bowls–for nearly the price of a bowl. That is a perfectly fine option, I’m sure, but I got that weird desire I sometimes get to spend a stupid amount of time and effort to make something unique and my own. Since I’m always looking for ways to recycle packaging, I also thought it was a great way to use up some foam padding.
My spouse ordered some fancy speakers a while ago which came packed in some very durable and malleable padding and with nice black cloth covers to protect the speakers from scratches. In this project, I found a use for practically all of it. I had no pattern, just an idea in my head, speaker packaging, and a bunch of teal canvas. With some added supplies, I think I created something fun and interesting for technically less than the purple bags I saw on the internet. So I thought I’d try and share the process with the other 15 people on Earth who have a set of crystal singing bowls and a wild flair for DIY.


Haphazard Instructions
Note: For reference, I made two bags. Each big enough for a 12” bowl. One bag holds four bowls, and the other holds three.
Witchy note: Building your own case leaves a million hidden and internal places to paint and burn in sigils or leave sachets of herbs. Keep in mind what you wish to impart to the universe as you create these cases, leaving traces of intention behind as you cut, shape, and sew.
Supplies
- big sheets of malleable foam padding
- I am certain that this can be collected over time from just regular shopping. The amount needed will depend on the size of the bowls you have. You can measure against your bowls as you collect, or do some math. Whichever suits you. Just make sure to add in space to keep things from being too snug.
- canvas
- I had 2 yards of duck canvas and was able to make two bags.
- belting strapping
- I had 3 yards and was just able to make two straps on each bag. I would have liked for the straps to have been longer so I could have sewn them further down the body of the bag for more stability. I would suggest an extra yard or so to be added.
- zipper
- I used a 40” #5 zipper and believe it was the perfect choice.
- lining fabric
- A couple of yards of jersey would be great, but this is completely a personal design choice. I used what I had (random yardage of very stretchy black jersey).
- plywood
- This is probably the most difficult of the items to get simply because it must be cut in to a circle. 1/4 inch plywood is thick enough. I cut two 14” circles to go at the very bottom of each bag to give it stability. I think having another piece in the lid would be a good idea, but I did not have enough plywood. I have a tool for cutting circles, but I’m sure places that sell plywood can help out if you do not.
- thread and a sewing machine
- As with all sewing, a machine is optional but I like to use one.
- tape and a glue gun
- The foam will need to be held in to tubes and fabric will need to be held on foam. Sewing with a needle is always an option instead.
Process
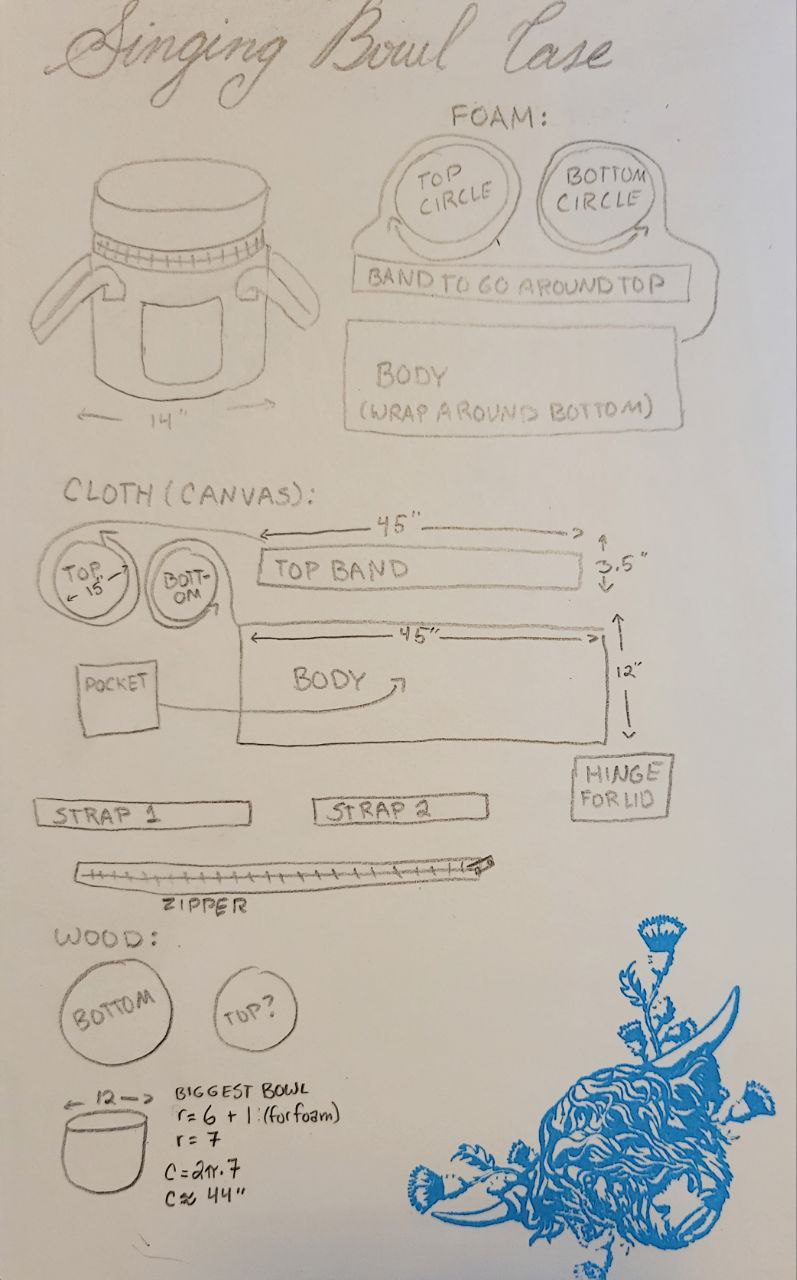
A note on math: My largest bowl is 10 inches tall and 12 inches in diameter, and the foam I used was 1 inch thick, so the radius of the bag with foam would be 7 inches. If we can recall c=2π*r from our school days (look, it came in handy!), that means that the bag would have a 44 inch circumference. This is handy if you want to measure out your fabric. You can also just wrap things around as you build it. It’s important to remember that you don’t want it to be too snug, though. So adding on an extra half an inch doesn’t hurt.


For the first case, I had enough foam to make entire circles for the top and bottom, but for the second, I had to piece together half circles. I also didn’t like the thickness of the foam for those circles, so I halved it. You can see the plywood circle as well and the walls of the bag sitting near my largest bowl. My scraps were *just* tall enough, but I had to tape two pieces together to reach the circumference.


I made sure to test the fit constantly during this process. It’s also important that it isn’t too snug. This is where the rounding of the circumference catches up.


The top and bottom bits of foam need to be wrapped in lining. This is where I used glue because I couldn’t be arsed to sew the whole thing on there. Shoddy craftship, I know.


For lining the body and the lid, I sewed jersey in to tubes and stretched it around the foam. I didn’t use any glue or sewing here, just tight wrapping.


On to the body of the bag, it’s important to try and get the pocket centred before sewing the body in to a tube.


If you have enough fabric, the math is unnecessary, because you can always just wrap and pin. It’s important to do top stitching along the sides of the seam when making the body (and lid). Not only does it look nice, but it helps keep it secure.


I tested the fit with the right side out (pocket facing out), but then it must be turned right side in so that we can pin the bottom circle. But make sure you clear the pocket. You don’t want the pocket to be sewn up in to the bottom seam.


Pinning and sewing the bottom. It’s exactly like sewing a sleeve.


Try it on the foam liner again, this time with the plywood in the very bottom (beneath the bottom foam circle). Then trim the excess from the top and pin and sew the zipper. Top stitching is, again, preferred afterwards.


I got really in to sewing and missed a couple photos of sewing the lid, but the process is pretty much identical to sewing the body. Make a tube; sew the top circle like a sleeve; and the pin the other half of the zipper. Arguably, the zipper is the most difficult part. Then, I sewed a square of fabric as a hinge between lid and body (where the zipper does not meet the fabric.) This is something I was not satisfied with in the final project and needs some work. Sewing the lid directly to the body in the section where the zipper does not reach is another option.


Pinning and sewing the straps as evenly as possible and with an ‘x’ to make it more sturdy. Again, I would have liked longer straps but didn’t have enough belting.

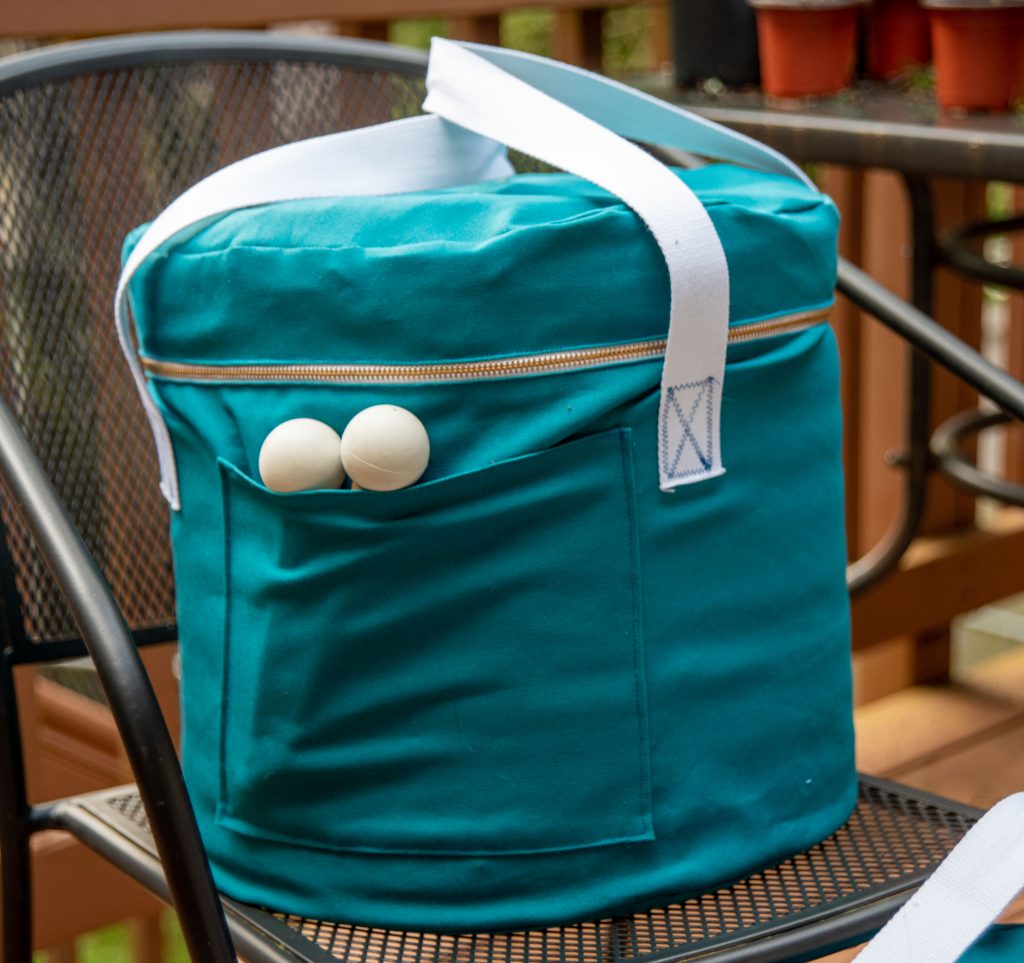
Both finished cases. The second one has a more centred pocket, but a ridiculously tall lid.


One thought on “Making a Singing Bowl Case”